Often when developing a program involving automation we want to schedule when and how often the program will run.
This can be achieved easily on Linux systems using the crontab utility. Crontab let’s you set a schedule for commands you want to run by setting the date, time and frequency of execution. Use this to schedule when Linux commands or programs will run.
In this tutorial, we’ll show you step by step how to use crontab to set up schedules for running commands. You’ll also learn how to log the output of a crontab job so you’ll know if it ran successfully or not.
We’ll go through the basic setup of crontab to enable you to schedule programs quickly. As a reference, also checkout the crontab Linux manual page which contains instructions on its use.
Accessing the crontab editor
On Linux systems, crontab is a file that lists instructions for the cron daemon to run a command at a specific time. The cron daemon does the work in running the commands at the set time.
For us to make use of this scheduling capability, we need to list all commands we want to run in the crontab file using the crontab expression syntax.
First check the cron daemon is running on your system by running the following command:
service cron status
If the cron daemon is running, you’ll see the following first couple of lines or similar from the output:
cron.service - Regular background program processing daemon
Loaded: loaded (/lib/systemd/system/cron.service; enabled; vendor preset: enabled)
Active: active (running) since Wed 2020-11-18 06:18:01 GMT; 24h ago
The cron utility should be installed by default on Linux systems. However, if for some reason it’s not installed you may do so on Debian based systems by running:
sudo apt-get update
sudo apt-get install cron
After installing, start the cron service using:
sudo systemctl enable cron
Next, open the crontab file. To edit the crontab file run on the command line:
crontab -e
If this is the first time you’re opening the crontab editor the following dialogue will show.
Select an editor.  To change later, run 'select-editor'.
 1. /bin/nano        ---- easiest
 2. /usr/bin/vim.tiny
 3. /usr/bin/code
 4. /bin/ed

Choose 1-4 [1]:
We’ll use the nano editor. So type in 1 and press ENTER to select the nano editor. The crontab file will look as follows:
# Edit this file to introduce tasks to be run by cron.
#
# Each task to run has to be defined through a single line
# indicating with different fields when the task will be run
# and what command to run for the task
#
# To define the time you can provide concrete values for
# minute (m), hour (h), day of month (dom), month (mon),
# and day of week (dow) or use '*' in these fields (for 'any').
#
# Notice that tasks will be started based on the cron's system
# daemon's notion of time and timezones.
#
# Output of the crontab jobs (including errors) is sent through
# email to the user the crontab file belongs to (unless redirected).
#
# For example, you can run a backup of all your user accounts
# at 5 a.m every week with:
# 0 5 * * 1 tar -zcf /var/backups/home.tgz /home/
#
# For more information see the manual pages of crontab(5) and cron(8)
#
# m h  dom mon dow   command
In the crontab file, a line beginning with # represents a comment. To get you started, the file details some basic instructions when making an entry to the file.
Setting up crontab to run commands
Before making an entry to the crontab file, it’s good practice to first test the command on your terminal.
For this example we’ll run a command that exports the current date and time to a file called file.txt.
We want to append each export of running the command to the file. The command to do this is:
$ date >> file.txt
If we run this command every couple of seconds on our terminal, the contents of file.txt will show the time incrementing:
Thu 19 Nov 2020 20:06:44 GMT
Thu 19 Nov 2020 20:06:50 GMT
Thu 19 Nov 2020 20:06:53 GMT
Thu 19 Nov 2020 20:06:56 GMT
Thu 19 Nov 2020 20:06:58 GMT
Now that we’ve confirmed the command we want to run, we’ll place this in the crontab file to test if the cron job will execute it correctly.
As described in the crontab file instructions, the format of an entry must be of the format:
m h dom mon dow command
This represents the syntax to specify the time to run the job followed by the command to run.
Open the crontab file editor using crontab -e. At the end of the file enter the following:
* * * * * date >> file.txt
In this example, we’re using [* * * * *] to initially set the command to run every minute (We’ll discuss how to translate this syntax in the next section).
This will allow us to first test the command will be executed successfully by the crontab job before we set our desired schedule.
After making the entry to the crontab file save the changes. On the nano editor this is done by pressing Ctrl + X followed by Y.
After the nano editor closes you will receive the following confirmation when an edit is successfully made to the crontab file:
crontab: installing new crontab
Let a few minutes pass so the time can be exported to the file.
Now locate file.txt to check the command run was successful and it ran every minute as specified in the crontab file.
But wait, where exactly will file.txt be located?
This is a good time to bring up environment variables and how they differ between our user environment and the crontab environment.
Environment variables are values stored within a system which are shared with applications to pass on information from the system. Environment variables are stored per user that exists on the system. For Linux you can print the list of environment variables using:
printenv > env.txt
Running this on your terminal will export all environment variables for your user profile to a file called env.txt.
Run this command on your terminal and open env.txt. As you’ll see there’s a lot of defined variables!
Knowing about environment variables is important to using crontab effectively. For the command we specified for the crontab job to run (date >> file.txt) the location of file.txt will depend on what the default working directory of crontab is.
We can find out what the environment variables used by crontab are by letting crontab execute the printenv command and saving the output to a file. But this time we’ll specify the exact path to export the file.
Open the crontab editor again using crontab -e. Then write the following to the crontab file and save the file (replace user with the actual name of your user on the Linux system):
* * * * * printenv > /home/user/crontab_env.txt
After at least one minute has passed check your /home/user/ directory for the crontab_env.txt file. It will contain the list of environment variables used by crontab. Yours should look similar to below:
LANGUAGE=en_IE:en
HOME=/home/user
LOGNAME=user
PATH=/usr/bin:/bin
LANG=en_IE.UTF-8
SHELL=/bin/sh
PWD=/home/user
As you can see, not as much environment variables are defined under crontab compared to our user account.
Keep this in mind if you happen to be running commands or scripts that rely on system environment variables. Although a command or script may execute correctly under your user environment variables, the result may be different when running the same command or script through crontab. This is because the crontab job will run under its own defined set of environment variables.
For this tutorial, the point of printing the crontab environment variables is to know where the default working directory of crontab is. This is listed by the value of the environment variable called PWD which we can see for crontab is /home/user. This means crontab is using your user account home directory as its default directory.
Tip: Environment variables can be created, removed or edited. For example, the value of the default working directory which is stored in the variable PWD can be changed to something else. See this article from Ubuntu explaining how to manipulate environment variables.
Now we know that file.txt from running the command date >> file.txt should be created under /home/user. Wasn’t that difficult to find after all!
Under your /home/user locate file.txt. If you can find the file this means the crontab job executed successfully! The contents of the file should also show the time incrementing exactly every 1 minute. This proves the crontab job is running every 1 minute as we specified in the crontab file.
Thu 19 Nov 2020 20:08:01 GMT
Thu 19 Nov 2020 20:09:01 GMT
Thu 19 Nov 2020 20:10:01 GMT
Thu 19 Nov 2020 20:11:01 GMT
Thu 19 Nov 2020 20:12:01 GMT
Scheduling the time and frequency to run a command
Now let’s learn how to run a crontab job under various set schedules.
The crontab expression syntax
To schedule running of jobs at different times, we need to become familiar with the expression for setting crontab schedules.
The syntax of any entry in the crontab file should be of the format:
m h dom mon dow command
The values before the command represent time and date fields. The meaning and range of allowed values are:
- m = minute | 0-59
- h = hour | 0-23
- dom = day of month | 1-31
- mon = month | 1-12 (Jan-Dec)
- dow = day of week | 0-7 (0 and 7 = Sunday)
Each time and date field contains a single value or a range of values.
Each field may also contain an asterix character [ * ] to represent all or any values in the range.
Examples
Let’s go through some example expressions.
Example 1.
To schedule a command to run at 23:05pm every Wednesday is: [5 23 * * 3]
- m = 5
- h = 23
- dom = * (all dates)
- mon = * (all months)
- dow = 3 (Wednesday)
Example 2.
To run at 04:30am every day is: [30 4 * * *]
- m = 30
- h = 4
- dom = * (all dates)
- mon = * (all months)
- dow = * (all days)
Example 3.
To run at 06:00am on 1-3 of July and 1-3 of August is: [0 6 1-3 7-8 *]
- m = 0
- h = 6
- dom = 1-3
- mon = 7-8 (July-August)
- dow = * (any day)
Example 4.
There are also other ways to provide more flexibility in specifying a list of values.
Use a comma [ , ] to list a set of values not in sequence.
To run at 06:00am on 1,10,20 of April and 1,10,20 of June is: [0 6 1,10,20 4,6 *]
- m = 0
- h = 6
- dom = 1,10,20
- mon = 4,6 (April, June)
- dow = * (any day)
Example 5.
You can also use a forward slash [ / ] to step values.
To run at 23:00pm every second day of the week starting from Sunday is: [0 23 * * 0/2]
- m = 0
- h = 23
- dom = * (all dates)
- mon = * (all months)
- dow = 0/2 (0 means starting from Sunday and /2 means “every second day”)
As you can see there is huge flexibility on how the time and date scheduling can be set using these expressions.
I recommend the crontab guru webpage to check your expression. Use it to play around with more examples or if you want to be sure you have a scheduling expression set correctly. It will translate the crontab expression into understandable english for you.
Taking one of our above examples: [0 6 1,10,20 4,6 *]
We can see crontab guru webpage translates this to:
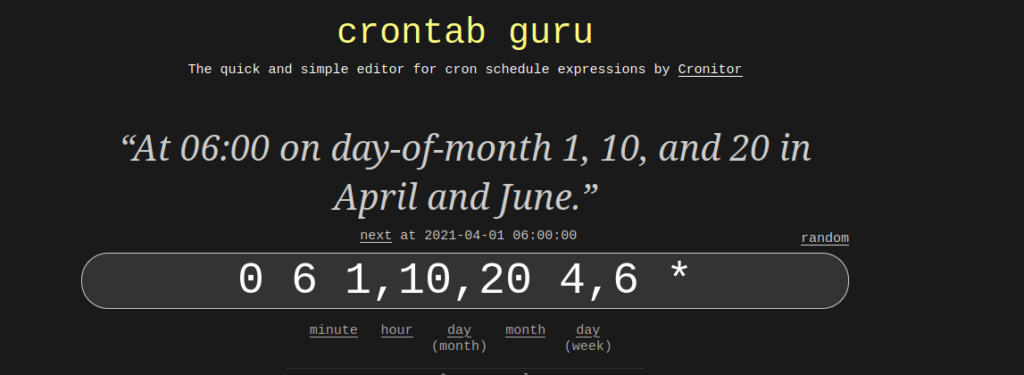
This is very useful for understanding or verifying crontab expressions!
Running our command at a set schedule
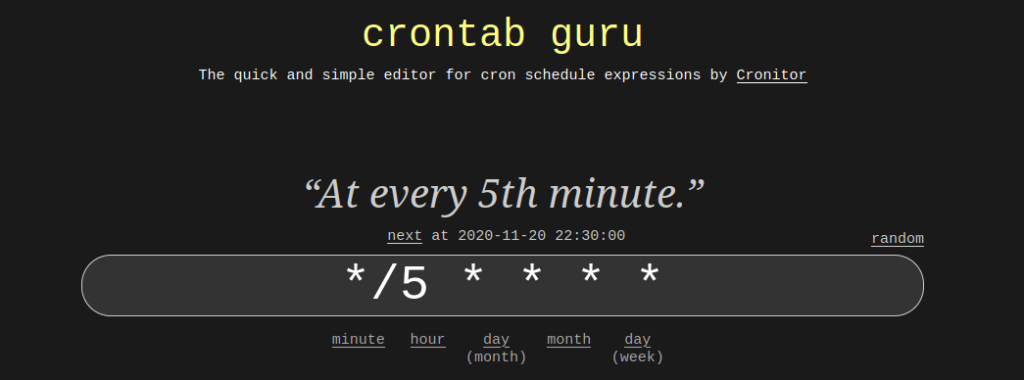
Now that we’ve learnt how to write crontab expressions, let’s take the command date >> file.txt and this time edit our crontab file so it will run every 5 minutes (we’ll use a short interval as we don’t want to wait too long).
The expressions for this is: [*/5 * * * *]
We can verify this on the crontab guru webpage to be sure we are correct:
Now open the crontab editor and edit the line with our command so it is now:
*/5 * * * * date >> file.txt
After some time has passed open file.txt and confirm the command ran every 5 mins:
Fri 20 Nov 2020 17:35:01 GMT
Fri 20 Nov 2020 17:40:01 GMT
Fri 20 Nov 2020 17:45:01 GMT
Fri 20 Nov 2020 17:50:01 GMT
Fri 20 Nov 2020 17:55:01 GMT
You can play around with various scheduling expressions. The most important thing is you know how to set your commands to run at your desired schedule!
Using logs to monitor crontab job result
We know how to run commands with crontab and schedule the frequency. But how can we know if a job ran successfully?
Our example command date >> file.txt is simple to verify as we are printing a result that can be verified by checking the contents of the file.
But what if the command does not have a physical output we can check? Because crontab jobs run in the background you will not be alerted if the job fails. Also, depending on the nature and frequency of the job it may be tedious to check if each job run was successful by checking the expected result of each run.
For example, let’s see what happens if we take our example command and make it purposely fail by using an invalid command:
* * * * * dlate >> file.txt
We’ve purposely called the command dlate which is invalid. Placing this in the crontab file and allowing the job to run will still create a file called file.txt but the contents will be empty. There is no quick way to find out why the job failed.
Let’s look at how we can make sure any errors from our command are also logged into the file.
One approach to this is to log the stderr stream output of each crontab job you’re running. On a system, stderr refers to standard error, which is where processes log error messages.
To log the output from stderr requires a few additional lines after the command in the crontab file.
Open the crontab file and edit the command so it’s now:
* * * * * date >> file.txt 2>&1
We’ve added 2>&1.
“1” represents the file descriptor for stdout which is standard output, where the normal output of processes are logged. “2” represents the file descriptor for stderr which is standard error, where errors from processes are logged.
Our entry in the crontab file now translates to: export both stdout and stderr of the date command to file.txt.
This means we’ll be able to see any potential errors that may occur in running the command. If the command run is successful, the expected output will continue to be logged to the file.
Let’s run the command through crontab using this extra logging with an error in our command:
* * * * * dlate >> file.txt 2>&1
When crontab runs this time we’ll see our file.txt now logs an error:
/bin/sh: 1: dlate: not found
As an alternative, if you want to separate the files where stdout and stderr are logged, use the following syntax:
* * * * * date >> file.txt 2>error.txt
This will log stdout of the program to file.txt and stderr to error.txt.
This syntax for logging comes handy in situations when custom programs are run and we want a way of knowing if an error occurred. We’ll further show the usefulness of this in the next section.
Scheduling running of a python program
A crontab job will simply execute a command. We can use this factor to also execute applications at a desired schedule. Let’s see how we can set up the schedule of a python program.
This python program called crontabtest.py will simply read the contents of a file called crontabtest.txt and print the contents.
# crontabtest.py: open file and print contents
file = open("crontabtest.txt", 'r')
print(file.read())
Crontabtest.txt will contain “hello world”.
hello world
Running this on the command line using python crontabtest.py will output “hello world” to stdout.
$ python crontabtest.py

hello world
Now let’s run this program through crontab.
Open the crontab editor and place in the file:
* * * * * python crontabtest.py
Remember, since the default working directory of crontab is /home/user this is where crontab will assume the file is unless you specify full paths. So place both crontabtest.py and crontabtest.txt under /home/user (where user is your own user profile on the PC).
Wait for the job to run after a minute and check the result.
But wait. How exactly do you check the result?
There isn’t a way to check this using our current command expression.
Unlike our previous examples, our python program doesn’t output stdout to a physical file we can check.
This is where the stdout and stderr logging syntax we learned in the previous section comes handy. We should add some logging to see what’s going on with the crontab job.
So let’s log both the stdout and stderr output from the program to a file called log.txt using:
* * * * * python crontabtest.py >> log.txt 2>&1
When the job has run check the content of log.txt. If it ran successfully you’ll see log.txt contains the “hello world” output as expected.
Let’s also test if an error will be captured in our log file. Remove crontabtest.txt from your /home/user directory which will cause the program run to fail. Let the crontab job execute the program again.
This time log.txt will show an error occurred:
Traceback (most recent call last):
File "crontabtest.py", line 2, in
file = open("crontabtest.txt", 'r')
FileNotFoundError: [Errno 2] No such file or directory: 'crontabtest.txt'
As we can see, knowing how to log the result of a crontab job is very useful so we can easily check if our program run failed.
The format of command >> log.txt 2>&1 to capture both stdout and stderr can be followed for any command you want to execute.
Conclusion
You should now be familiar with using the crontab utility on Linux to set schedules for command execution.
We’ve covered how to access the crontab file, how to understand the scheduling expressions and how to log the result of a crontab job.
Crontab can be very useful in automating your custom applications and provides great flexibility in how you can schedule when to run them.
Got questions? Comment below.
If you found this useful check out other tutorials we have on our blog which will guide you on other programming basics:
- Quick and easy guide: Sending emails with Python
- Learn web scraping with Python in minutes: The basics using selenium